React Native
React Native
Get OAuth2 Access Token for Azure Registered App
See more OAuth2 Examples
Demonstrates how to get OAuth2 access token for an Azure Registered App from a desktop application or script. This example demonstrates the OAuth2 authorization flow.This example requires Chilkat v10.1.2 or greater.
Chilkat React Native Downloads
import { CkDateTime, FileAccess, JsonObject, OAuth2 } from '@chilkat/react-native'
function chilkatExample() {
// To further clarify, see OAuth 2.0 Authorization Flow
const oauth2 = new OAuth2();
// This should be the port in the localhost callback URL for your app.
// The callback URL would look like "http://localhost:3017/" if the port number is 3017.
oauth2.listenPort = 3017;
// ----------------------------------------------------------------------------------------------------------
// The screenshot at the bottom of this page shows how we created the Azure App Registration for this example.
// ----------------------------------------------------------------------------------------------------------
// Note: The endpoint depends on the Azure App Registration.
// See How to Choose the Correct Endpoints for your Azure App Registration
oauth2.authorizationEndpoint = 'https://login.microsoftonline.com/common/oauth2/v2.0/authorize';
oauth2.tokenEndpoint = 'https://login.microsoftonline.com/common/oauth2/v2.0/token';
// Replace these with actual values.
oauth2.clientId = 'CLIENT_ID';
// This is for Require Proof Key for Code Exchange (PKCE)
// See OAuth2 PKCE Explained
oauth2.codeChallenge = true;
oauth2.codeChallengeMethod = 'S256';
// Provide a SPACE separated list of scopes.
// See https://developer.microsoft.com/en-us/graph/docs/authorization/permission_scopes
// Important: To get a refresh token in the final response, ask for "offline_access" scope
oauth2.scope = 'openid profile offline_access user.readwrite mail.readwrite mail.send files.readwrite';
// Begin the OAuth2 three-legged flow. This returns a URL that should be loaded in a browser.
let url: string;
try {
url = oauth2.startAuth();
} catch {
console.log(oauth2.lastErrorText);
return;
}
// Launch the default browser on the system and navigate to the url.
// The LaunchBrowser method was added in Chilkat v10.1.2.
try {
oauth2.launchBrowser(url);
} catch {
console.log(oauth2.lastErrorText);
return;
}
// Wait for the user to approve or deny authorization in the browser.
let numMsWaited = 0;
while ((numMsWaited < 90000) && (oauth2.authFlowState < 3)) {
oauth2.sleepMs(100);
numMsWaited += 100;
}
// If the browser does not respond within the specified time, AuthFlowState will be:
//
// 1: Waiting for Redirect – The OAuth2 background thread is waiting for the browser's redirect request.
// 2: Waiting for Final Response – The thread is awaiting the final access token response.
// In either case, cancel the background task initiated by StartAuth.
if (oauth2.authFlowState < 3) {
oauth2.cancel();
console.log('No response from the browser!');
return;
}
// Check AuthFlowState to determine if authorization was granted, denied, or failed:
//
// 3: Success – OAuth2 flow completed, the background thread exited, and the successful response is in AccessTokenResponse.
// 4: Access Denied – OAuth2 flow completed, the background thread exited, and the error response is in AccessTokenResponse.
// 5: Failure – OAuth2 flow failed before completion, the background thread exited, and error details are in FailureInfo.
if (oauth2.authFlowState === 5) {
console.log('OAuth2 failed to complete.');
console.log(oauth2.failureInfo);
return;
}
if (oauth2.authFlowState === 4) {
console.log('OAuth2 authorization was denied.');
console.log(oauth2.accessTokenResponse);
return;
}
if (oauth2.authFlowState !== 3) {
console.log(`Unexpected AuthFlowState:${oauth2.authFlowState}`);
return;
}
console.log('OAuth2 authorization granted!');
console.log(`Access Token = ${oauth2.accessToken}`);
// When the token is near expiration, your app can refresh as shown here:
// Refresh Expiring OAuth2 Access Token for Azure Registered App
// Get the full JSON response:
const json = new JsonObject();
json.load(oauth2.accessTokenResponse);
json.emitCompact = false;
// The JSON response looks like this:
// {
// "token_type": "Bearer",
// "scope": "User.Read Mail.ReadWrite Mail.Send",
// "expires_in": 3600,
// "ext_expires_in": 0,
// "access_token": "EwBAA8l6B...",
// "refresh_token": "MCRMdbe...",
// "id_token": "eyJ0eXA..."
// }
// If an "expires_on" member does not exist, then add the JSON member by
// getting the current system date/time and adding the "expires_in" seconds.
// This way we'll know when the token expires.
if (!json.hasMember('expires_on')) {
const dtExpire = new CkDateTime();
dtExpire.setFromCurrentSystemTime();
dtExpire.addSeconds(json.intOf('expires_in'));
json.appendString('expires_on', dtExpire.getAsUnixTimeStr(false));
}
console.log(json.emit());
// Save the JSON to a file for future requests.
const fac = new FileAccess();
fac.writeEntireTextFile('qa_data/tokens/_myAzureApp.json', json.emit(), 'utf-8', false);
// This is a screenshot of how we created the Azure App for this example:
// 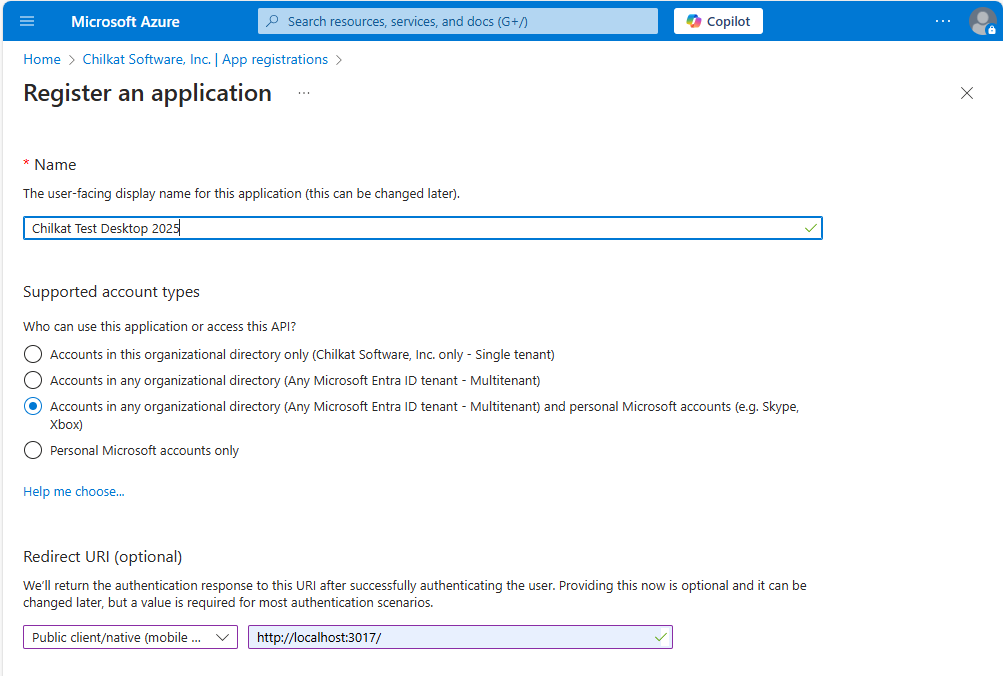 }
}